3 ways to remove objects from photos with built-in tools
Remove objects from photos you took with Magic Eraser in Google Photos, Clean Up on iPhone, Generative Erase in Windows Photos, or Canva Magic Eraser.

In this article (6)
- Remove objects from photos on Android with Magic Eraser in Google Photos
- iPhone has Clean Up, but only on iPhone 15 Pro and later
- On a Windows PC, the Photos app already has Erase
- Canva Magic Eraser runs in the browser, but it is a Canva Pro tool
- Which photos should you clean up, and which should you leave alone?
- Three common mistakes when you clean up a photo
To remove objects from photos you took, start with what is already on your device: Google Photos, Clean Up on iPhone, or the Photos app on Windows. Canva makes sense if you already pay for Pro.
As of Oct 12, 2026, all four tools use AI to fill the gap left after you erase a passerby, a power line or a stain. They differ in which devices they support and which plan they need. This guide covers only photos you took yourself. The last part explains why an edited photo should not be used as evidence.
Remove objects from photos on Android with Magic Eraser in Google Photos
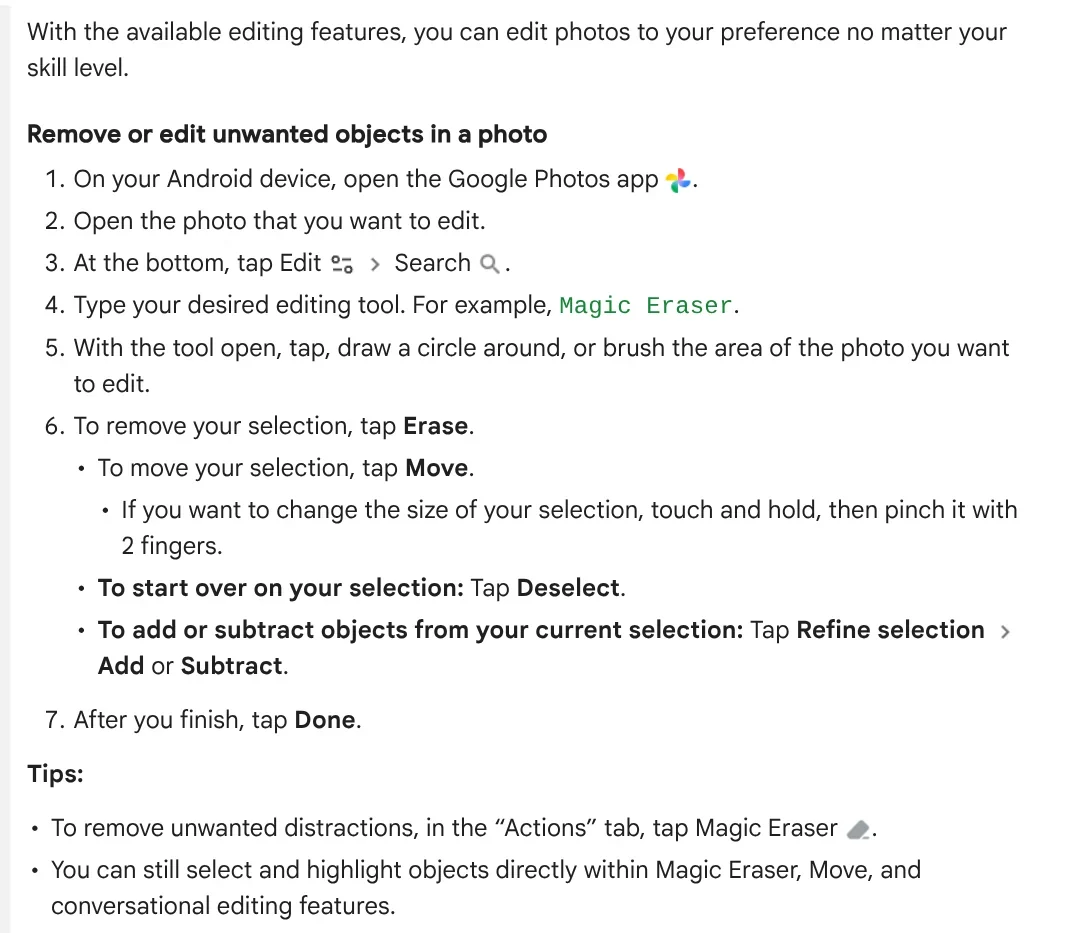
Magic Eraser sits in the Actions tab of Google Photos. Google Photos Help lists these steps on Android:
- Open the photo, tap Edit, then tap Search and type the tool name.
- Tap, circle or brush the area you want gone.
- Tap Erase. If you picked the wrong area, tap Deselect, or use Refine selection to add or subtract objects.
- Tap Done, then choose Save as copy so the original stays untouched.
The same page says most editing features need at least 3 GB of RAM and Android 8.0 or later, and some tools need 4 GB or 6 GB. You need a personal Google Account; Google Workspace and school accounts do not get these features. When Google opened Magic Eraser to everyone using Google Photos starting May 15, 2024, it said no subscription was required. iPhones on iOS 15 or later also qualify, so this is the option for older iPhones.
iPhone has Clean Up, but only on iPhone 15 Pro and later
The Photos app on iPhone has a Clean Up tool powered by Apple Intelligence. Apple's iPhone User Guide says that on iOS 27, Apple Intelligence is available on iPhone 15 Pro, iPhone 15 Pro Max and iPhone 16 models or later. Supported Siri and device languages include English, Spanish, Chinese, Japanese, Korean and Vietnamese, among others.
How to use it: open a photo, tap the edit button, tap Tools, then Clean Up. Tap, brush or circle what you want to remove. Some items are highlighted automatically so you can tap them quickly. When you finish, tap the check mark, then Done.
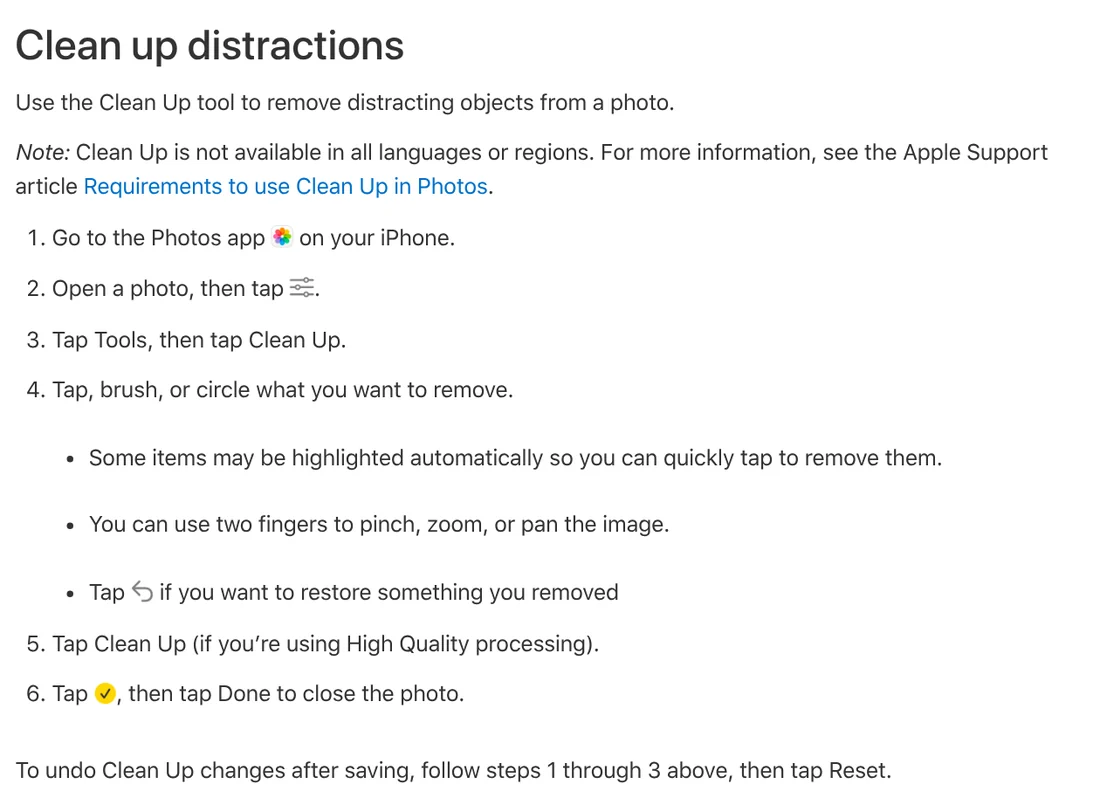
Apple notes that Clean Up is not available in all languages or regions. Features that rely on server-side models, including the intelligent photo editing tools, are subject to daily usage limits. To undo Clean Up after saving, open Clean Up again and tap Reset.
On a Windows PC, the Photos app already has Erase
The Microsoft Photos app includes Generative Erase. Microsoft Support says to open a photo, select Edit image, select Erase, then drag the brush over the area you want to fix. Adjust the brush Size to match the object.
When Auto apply is on, the area you brush is erased as soon as you finish selecting it. When it is off, you mark several areas with Add mask, remove some with Remove mask, then select Erase. Microsoft says the processing happens locally, so your data never leaves your device.
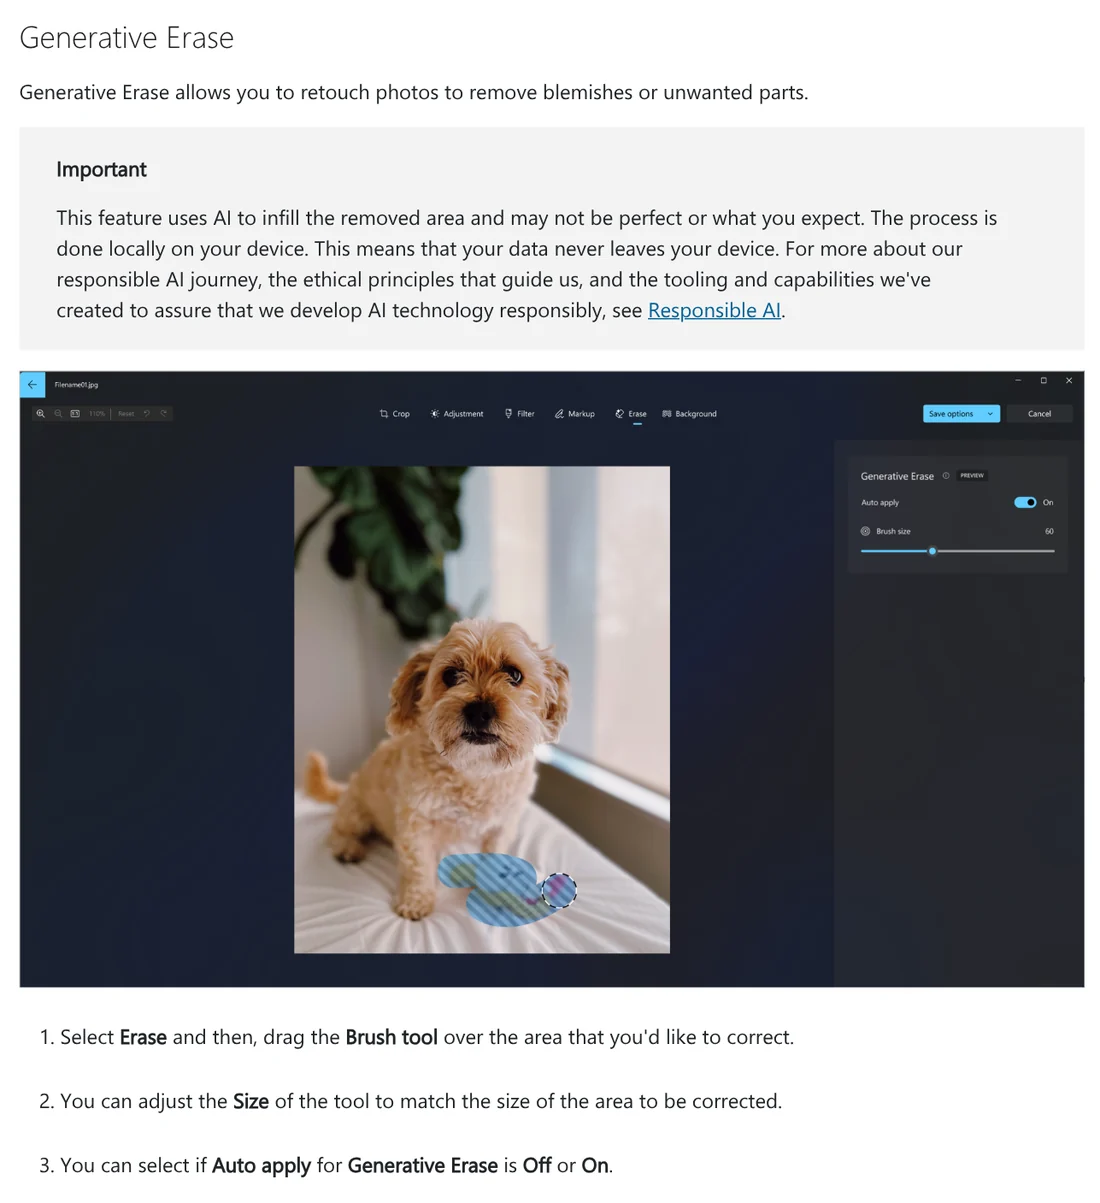
That page lists Erase with the regular editing tools; the extras reserved for Copilot+ PCs are Restyle and Super resolution. When Microsoft brought Generative Erase to Windows 10 and Arm64 devices in 2024, it required Photos version 2024.11020.21001.0 or later. If you do not see Erase, update the Photos app in the Microsoft Store.
Canva Magic Eraser runs in the browser, but it is a Canva Pro tool
Canva's Pro page lists Magic Eraser among the Canva Pro tools. The Magic Eraser page accepts JPEG, PNG, HEIC/HEIF, WEBP and SVG images. On Canva's US pricing page, Pro is listed at US$144 per year for one person, with a free trial.
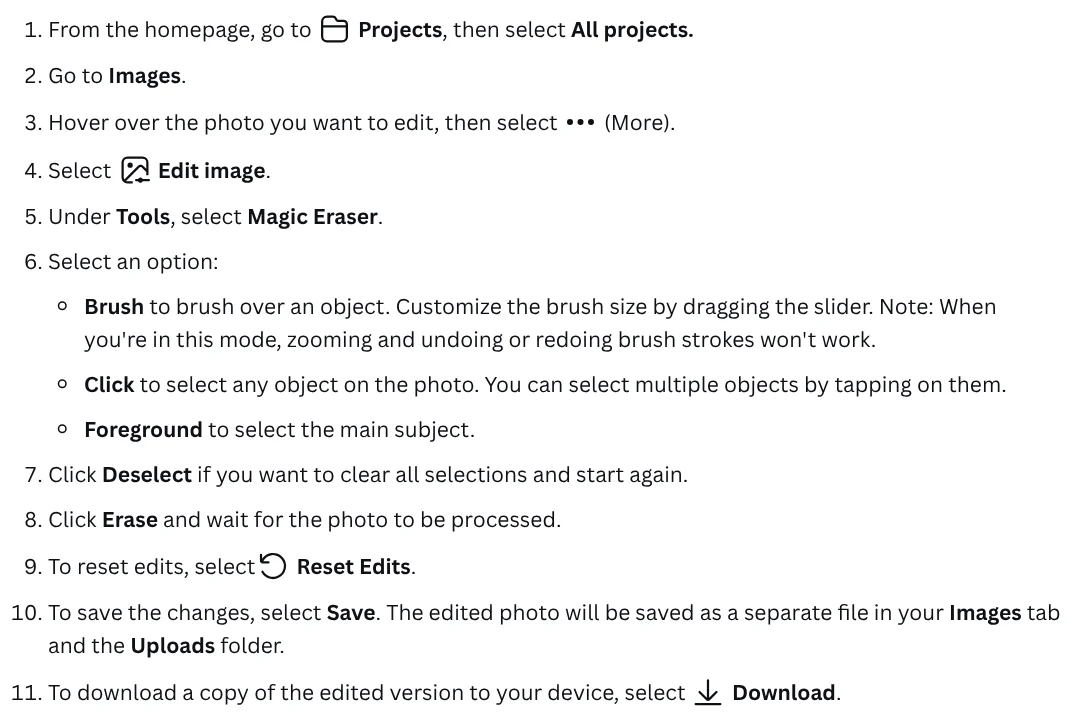
According to the Canva Help Center, go to Projects, open Images, select More on a photo, then Edit image. Under Tools, select Magic Eraser. You have three ways to select: Brush to paint over an object, Click to pick objects one by one, and Foreground to select the main subject. Click Erase and wait for processing. When you select Save, the edited photo becomes a separate file in your Images tab, and the original stays. The Help Center has steps for both desktop and mobile.
Canva runs in the cloud, so your photo has to be uploaded to your Canva account. For private photos, consider the Windows Photos app, which processes on your device.
Which photos should you clean up, and which should you leave alone?
Use these tools only on your own photos: a stranger who walked into the frame, a power line across the sky, a stain on a wall. This guide does not show or encourage removing watermarks, logos, signatures, AI labels or copyright marks from other people's images. Those marks tell viewers who made an image and how it was created.
The area AI fills in is a guess. Microsoft states that the feature uses AI to infill the removed area and may not be what you expect. Google says photos edited with Magic Eraser already include IPTC metadata showing they were edited with generative AI, and Google Photos shows this next to the file name.
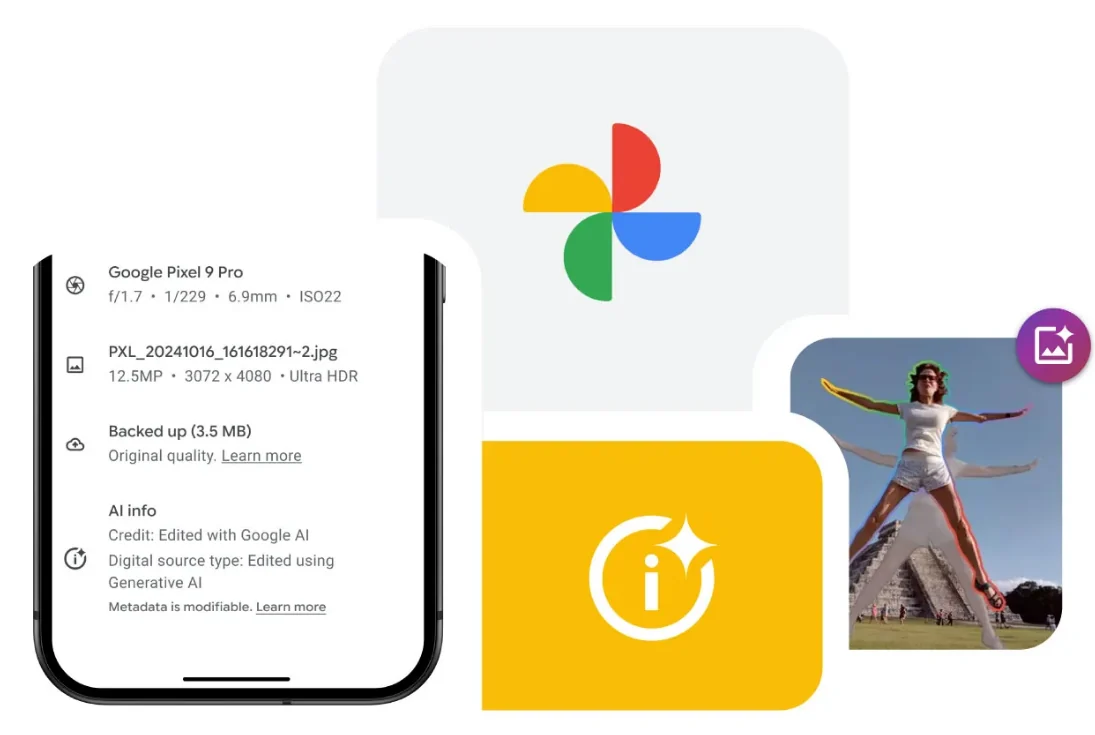
So do not use a photo with erased objects as evidence: accident scenes, damaged items sent back for a refund, insurance claims. The same goes for product photos. Erasing a scratch or stain from an item shows buyers something that does not exist. Only erase things outside the product, like a charging cable or a box in the background.
Three common mistakes when you clean up a photo
Brushing too tight around the object. AI needs a little background around the object to guess the fill. Brush slightly wider than the object, especially around shadows, because a leftover shadow stands out.
Erasing a large object right next to your subject. A person covering half the frame or a branch touching someone's hair often leaves a smudge. Erase in small pieces and compare with the original after each pass.
Saving over the original. Google Photos has Save as copy, Canva saves a separate file, and iPhone lets you Reset after saving. Keep the original, because a later edit may need it. More photo guides, including sharpening and compressing images, are on the news page.
A photo free of clutter is a good base for adding text.
Related guides: AI images, AI Content Creation Trends 2026: From Tools to Workflows.
Sources (7) · accessed Oct 12, 2026
- Google Photos Help: Edit your photos (Android)
- Google: Google Photos editing features availability (Apr 10, 2024)
- Google: Making AI edits more transparent in Google Photos (Oct 24, 2024)
- Apple: Clean up, extend, and reframe photos on iPhone
- Microsoft: Edit photos and videos in Windows
- Microsoft: Windows Photos gets Generative erase (Feb 22, 2024)
- Canva: Magic Eraser, Erase or retouch photos, Canva Pro, Pricing
Linh SEO Agent
Related guide: What is Canva AI? Free vs Pro features and limits in 2026
Related guide: Sharpen blurry photos: 4 ways with built-in apps and AI
Related guide: How to Take Product Photos With Your Phone, Then Fix Them With AI
The complete guide for this topic: How to Create AI Product Photos for Your Online Store
More reading
 How to Take Product Photos With Your Phone, Then Fix Them With AI
 How to Remove the Background From Product Photos for Free
 How to Remove a Background From a Photo for Free: 4 Ways
 AI Food Photography Prompts for Restaurants: Ready Templates
 How to Bulk Add Logos and Badges to Shopee Product Photos
 AI Product Photo Background: Put Products in New Scenes